Transitioning to Sports Climbing Outside Part 1
Here are some tips I have been sharing with friends who transition outside from el climbing gym. I can't cover everything but I will try to cover the most important topics in a two part series.
Disclaimer: climbing is dangerous and anyone who tells you otherwise is a fool or a liar. Climbing has come a long way since hobnail boots and hemp ropes. If you are aware of the risks and have proper instruction, you can manage those risks. There are many ways to start learning to climb safely. Reading this blog is not it; this is not a substitute for professional training nor for common sense.
Orientating the Quick Draw
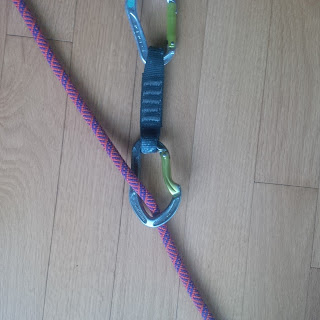
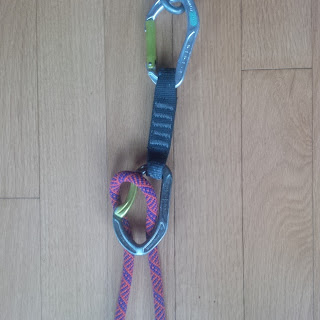
Unless you are working some of Chris Sharma's projects there are no quickdraws hanging outside just bolts. I will not go over all the details about how to hold a draw, how to carry it on your harness and how to clip it. Just make sure you don't your hands caught in the gate of the quick draw. What I will go over is how to orient the gate of the carabiner (aka biner) since it is often overlooked.The basic rules of thumb:
- The orientation of the biner clipped to the bolt doesn't matter (as long as it isn't catching on anything)
- If you are travelling left past the last clip, orient the gate of the biner that clips the rope to the right
- If you are travelling right past the last clip, orient the gate of the biner that clips the rope to the left
- If you are travelling relatively straight above the last clip, the orientation of the gate that clips the rope can be in either direction
It is easier to remember why to do something if you know the reasoning behind it: the rope can unclip from the last draw if the gate is oriented the same direction you travel. The pictures below illustrates what there is a slight chance of happening when you fall. Don't get too worked up about the orientation of the gate the chance that this actually happens is not super high.
Orientating Yourself so You don't Flip Over
How you position yourself relative to the rope is even more important than the orientation of your draws. If the rope is placed incorrectly when you fall, you will get flipped over faster than you can say "TAKE TAKE TAAAAKEEE!!" This is usually covered during an indoor sports climbing course but I feel like it is often poorly explained.
There are two scenarios to remember:
There are two scenarios to remember:
1. If you are centered over the last quickdraw, keep the rope between your legs
2. If both your feet are on the side of the last quickdraw, toe/leg tuck the rope to the opposite side with the leg that is closest to the draw
The best thing to do is watch this video by InlandEmpireDudes. I couldn't explain it better. Also, it covers the basics of Z-clipping.
 |
| Good position over the rope when centered above the bolt |
 |
| Reaallyyy bad position over the rope above when centered above the bolt |
2. If both your feet are on the side of the last quickdraw, toe/leg tuck the rope to the opposite side with the leg that is closest to the draw
 |
| Good position over the rope when off to the side of the bolt |
 | |
|
Building your First Anchor
Get training for this and go out with an experienced climber a couple times before attempting to build an anchor on your own. Always check the local guide book for acceptable practices for anchor building. Some areas accept using top rope belaying off rap rings where as others don't. If you don't know what a rap ring is don't worry about it for now. I would recommend mastering one type of anchor before learning the many different ones that are out there. That being said, there is not one that is perfect for every scenario.
There is a whole procedure to getting up a route and building in anchor which will be covered in another post.
There is a whole procedure to getting up a route and building in anchor which will be covered in another post.
The first type to learn is an anchor made with a figure eight on a bight. This is great when sport climbing since you will often encounter two bolts to make your anchor on.
The gear you need will set you back around 60 - 80 loonies:
- One double or triple length sling (60 cm or 120 cm)
- Grab a Black Diamond Nylon Runner for cheap
- Four locking carabiners
- Two d-shaped biners for the bolts such as some sweet DMM Screwgate Phantoms. If you are on a budget you can't got wrong with BD Screwgate Positrons
- Two pear shaped biners for the master point. I love the Grivel Mega twin gate biners.
Now that you have some sweet gear, you need to use it. You should already know how to tie an figure eight follow through knot. You need to learn a variation which is a figure eight on a bight.
 | |
|
2. Flip the biners such that the screwgate screws downwards. This takes advantage of the fact that gravity will help keep the gate locked.
 |
| Bolts zoomed in |
 |
| If you can make the knot that neat looking you're a champ |
 |
| Master Point with gates opposite and opposing |
I couldn't mention anchors without quickly going over the criteria for a good anchor. The acronym to remember the criteria is SERENE:
Solid: The bolts need to be installed correctly (usually not something in your control) and not have any significant rust
Solid: The bolts need to be installed correctly (usually not something in your control) and not have any significant rust
Equalized: The sling needs to be adjusted such that energy is transferred to both bolts when the anchor is weighted
Redundant: One bolt is good enough to hold you, two makes it redundant, et cetera
Efficient: It has to be made in a timely fashion
No Extension: If one side of the anchor fails, the other should not have much too much slack such that there is no shock loading on the other half
Closing Remarks
As I wrote this, so many more topics come to mind (such as being careful about how the rope rubs). Get outside; have fun; climb with some one who knows what they are doing and come back here for some more tips.


Thanks for the tip about the quick draw gate orientation based on the direction of the rope! No one has ever told me that
ReplyDeleteYou're very welcome!
Delete